When setting up an online store, one of the most important steps to building your brand is creating a custom domain. A personalized domain not only improves your Shopify store’s credibility but also boosts SEO, making it easier for customers to find your business online. While Shopify provides a default domain (e.g., yourstore.myshopify.com), switching to a custom domain gives your store a professional appearance and is essential for long-term brand growth. Here’s a detailed, step-by-step guide on how to set up a custom domain for your Shopify store.
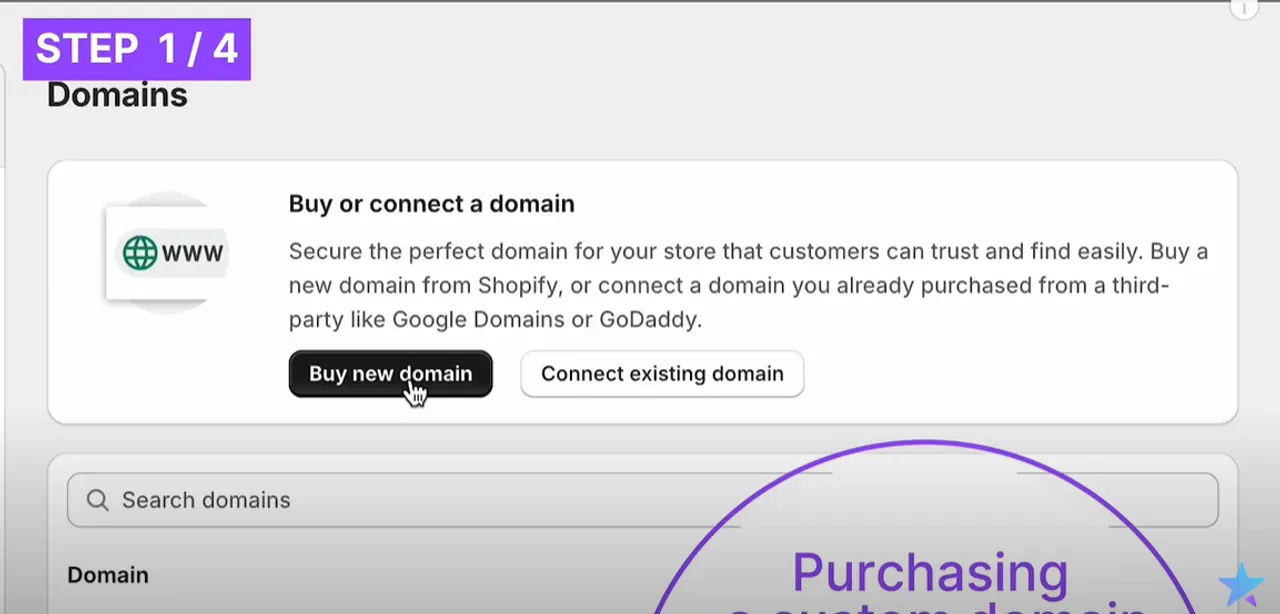
Step 1: Purchase a Custom Domain

Before you can connect a custom domain, you’ll need to purchase one. There are two main ways to acquire a custom domain:
-
Buy directly from Shopify: Shopify offers a simple way to buy and manage domains directly from your Shopify dashboard. By going this route, Shopify takes care of all the technical setup for you, including DNS configurations. This makes managing your domain easier since you won’t need to worry about technical details like DNS settings or verification records. If you're just starting, this is often the easiest option because everything is managed within the Shopify interface.
-
Buy from a third-party provider: If you prefer to buy a domain from a provider like GoDaddy, Namecheap, or Google Domains, you can connect that domain to Shopify. This requires more manual setup as you'll need to configure the DNS settings yourself. Third-party domains are often more flexible and can sometimes be cheaper than purchasing through Shopify, especially if you’re managing multiple domains.
After purchasing your domain from either Shopify or a third-party provider, the next step is to link it to your store.
Step 2: Connect Your Custom Domain to Shopify

Once you’ve acquired your domain, it’s time to connect it to Shopify. The steps to connect your domain differ slightly depending on whether you purchased it from Shopify or a third-party provider:
-
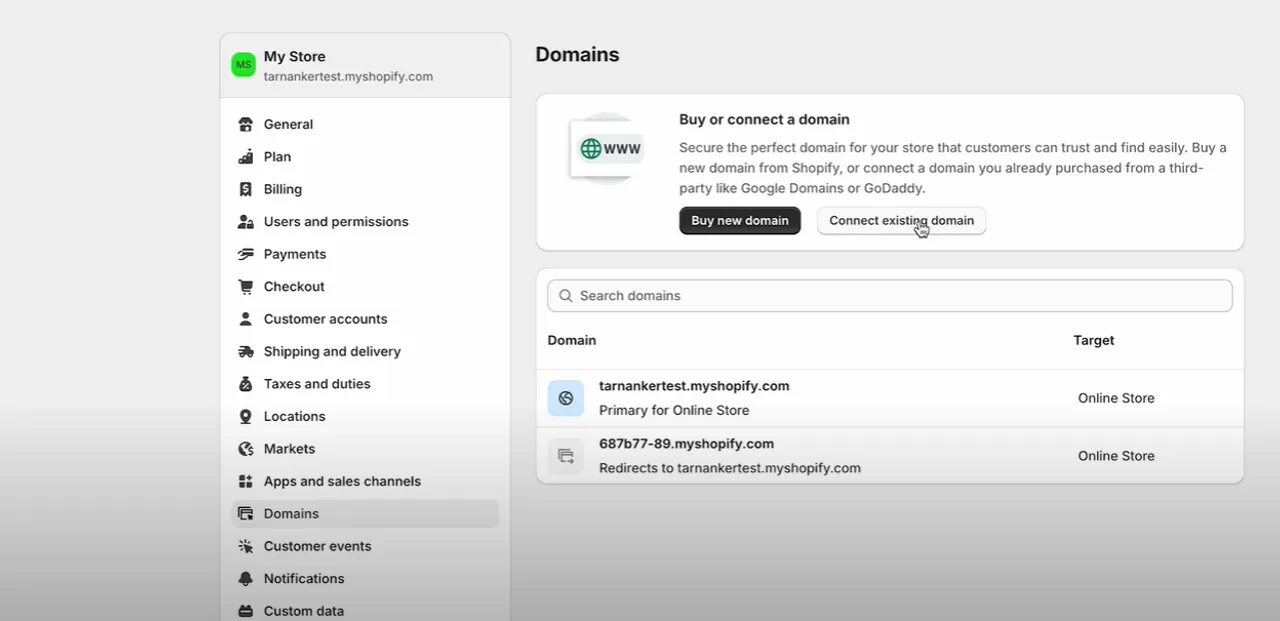
Connecting a Shopify-purchased domain: If you bought the domain through Shopify, it’s a straightforward process. Go to your Shopify admin panel, navigate to Settings > Domains, and click "Connect Existing Domain." If you purchased the domain via Shopify, it will automatically appear here. Shopify handles all the DNS setup for you, making this process hassle-free.
-
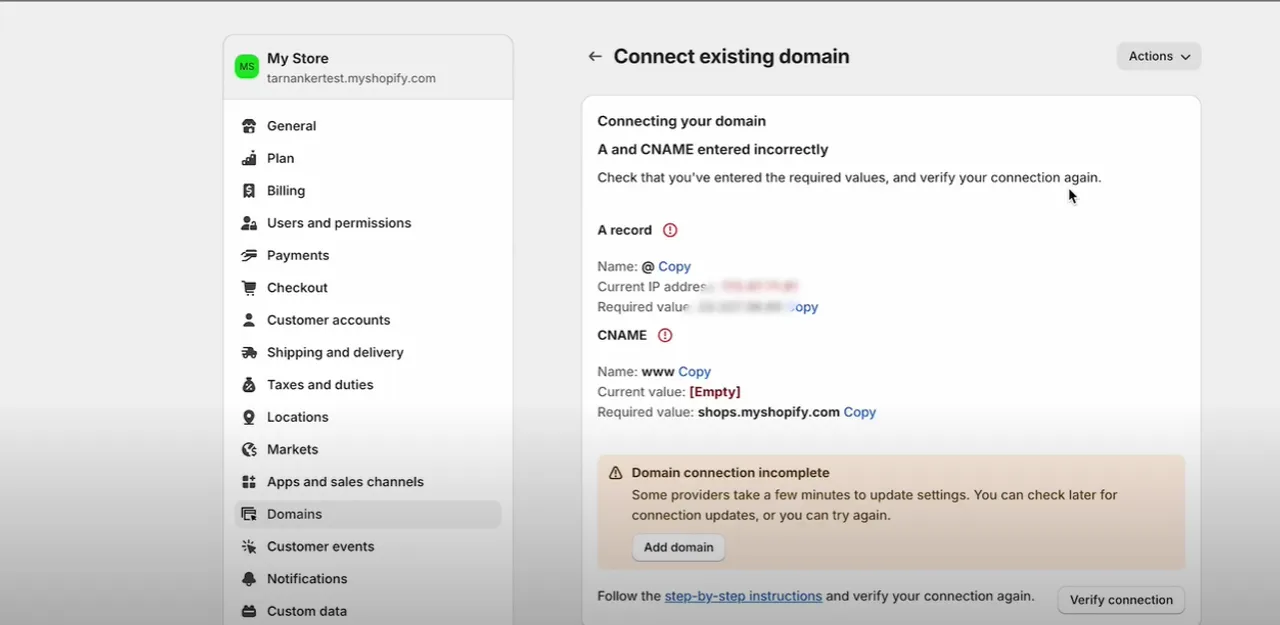
Connecting a third-party domain: For domains purchased from third-party providers like GoDaddy, Namecheap, or Bluehost, you’ll need to update the DNS settings manually. Here’s how:
-
Log in to your third-party domain provider’s dashboard.
-
Access the DNS settings or Zone File settings.
-
Update the CNAME record to point to shops.myshopify.com for your subdomains (such as www).
-
Change the A Record to Shopify’s IP address, typically 23.227.38.65 for the root domain.
-
Once you’ve updated the DNS settings, return to Shopify’s domain settings and click "Verify" to check if the connection is correctly configured.
The DNS updates might take some time to propagate (up to 48 hours), but in most cases, they are completed within a few minutes. For a deeper understanding of how to handle customer reviews on Shopify, check out our 5 Simple Steps to Integrate Customer Reviews on Shopify with Yotpo, and learn how to manage your Shopify inventory efficiently by visiting 6 Essential Steps to Manage Inventory in Shopify.
Step 3: Verify Your Domain Connection

After updating your DNS settings, head back to Shopify > Settings > Domains to verify the connection. This step ensures that your domain is correctly linked to Shopify’s servers and will be visible to users. Shopify will display a verification message once the connection is successful, confirming that the domain setup is complete.
If the verification process fails, double-check the DNS settings on your domain provider's control panel. Common errors include incorrect CNAME records or A Record IP addresses. Once everything is properly configured, reattempt the verification. The waiting time for DNS propagation varies, but you should allow up to 48 hours before rechecking.
Verifying the domain is a critical step because it confirms that your visitors will be directed to your Shopify store when they type in your custom domain. Without proper verification, your domain may not function correctly, leading to missed traffic opportunities.
Step 4: Set Your Custom Domain as the Primary Domain

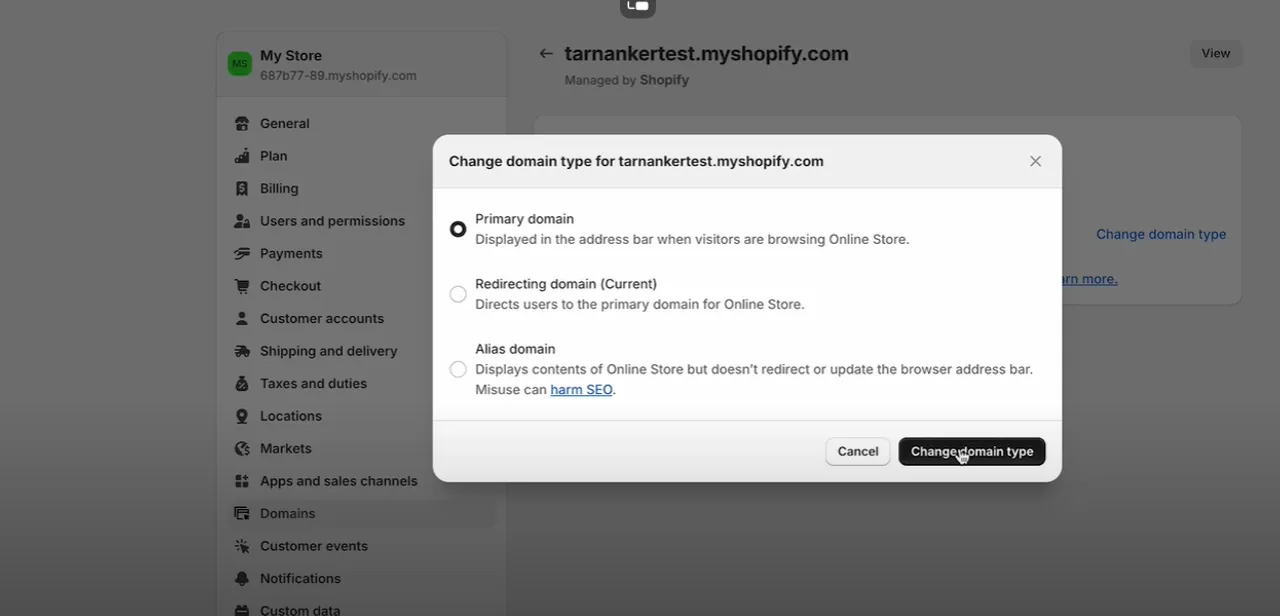
After your domain is successfully connected, you’ll want to make it your primary domain. The primary domain is the main address that customers will use to visit your store. Here’s how to set it:
-
Navigate to Settings > Domains in the Shopify admin dashboard.
-
Select your custom domain from the list of connected domains.
-
Click on "Set as Primary" to make your custom domain the default URL for your Shopify store.
This step ensures that when users visit your site, they will see your custom domain (e.g., www.yourstore.com) instead of the default Shopify domain (yourstore.myshopify.com). Using a custom domain enhances your store’s professionalism, builds trust with customers, and improves your SEO rankings, as Google prioritizes branded URLs.
Additionally, Shopify allows you to set up URL redirects, which ensures that visitors to your old domain are automatically redirected to the new custom domain, maintaining seamless user experience and preserving your SEO value.
Why Using a Custom Domain is Crucial for SEO and Branding
Switching to a custom domain offers several benefits for your Shopify store. First and foremost, it enhances your brand’s credibility. A professional-looking domain (e.g., www.mystore.com) builds more trust with potential customers than a generic myshopify.com address. Consumers are more likely to trust and shop from businesses with custom, branded domains, which in turn increases conversion rates.
Secondly, custom domains are important for SEO. Google and other search engines prioritize websites with their own branded domains over default URLs. Having a custom domain can help your store rank higher in search results, leading to increased visibility and traffic. Additionally, a custom domain simplifies your marketing efforts, as it’s easier for customers to remember and share a unique URL.
By following these four simple steps, you can seamlessly integrate a custom domain with your Shopify store, improving your brand recognition, SEO performance, and overall customer trust!


